Performance
Cladding
Aotearoa New Zealand has now had over 30 years of leaky building syndrome, caused by a combination of events including ‘monolithic’ cladding, untreated kiln-dried timber, poor workmanship, lack of understanding of flashings (or simply, lack of flashings), an inappropriate architectural ‘Mediterranean’ style design and, primarily, a lack of continuity between the air/water barriers (Dyer, 2019). Basically speaking, we let water get in and stopped it getting out or drying out. Part of this problem is still the fundamental misunderstanding of the function of these barriers, the performance of materials when acting as barriers, and how these barriers integrate with each other as they transition between systems. It has so far cost the country many billions of dollars and we have not yet got to the stage where we can guarantee that no further leaky buildings are being produced.
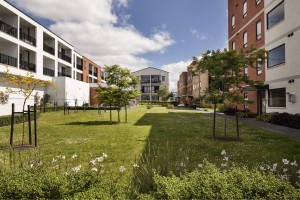
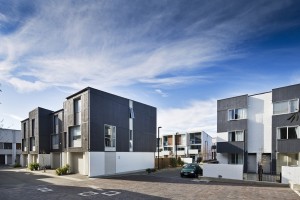
The building industry has tried to tackle the problem on a number of fronts, involving more training, better design, compulsory timber treatment, increased use of rigid air barriers, inclusion of flexible wall underlays serving as weather resistive barriers, and an almost universal application of drained and ventilated cavities. We’ve also had a massive switch back to older, more tried and tested cladding systems, such as painted timber weatherboard. These systems are not, however, as suitable for high-rise projects such as apartments and taller MDH. Other cladding systems such as brick veneer and aluminium weatherboard require less maintenance and are thus more suited to MDH.
Try to limit your external cladding systems to address complexity, different trades, and detailing clashes. Fewer trades on site mean fewer issues over who is responsible for stuff-ups. Plastered external walls can work well if they are allowed to move along planned, well-defined joints – open joints are far more forgiving than joints plastered flat. Materials that require more frequent coating applications, such as timber claddings, should only ever be used in areas with simple access for maintenance. If it is hard to get to or requires extensive scaffolding to get there, plan for the most durable finish you can afford.
There is a growing awareness in New Zealand that existing older buildings are poorly heated, badly ventilated, often mouldy and draughty, and are a primary cause of rheumatic diseases in poorer populations/socio-economic groups. Although MBIE opted to do nothing about external wall insulation in 2021, the raising of R-values required for roofs and windows in 2022 is a step in the right direction. Along with the ongoing massive increase in MDH, this means that we effectively need to rethink the way we build our external walls, particularly if we are to avoid interstitial moisture build-up (AKA Leaky Building Syndrome v2.0). A key part of that change will be a better understanding of the role of thermal bridging. Wall assessments need to take into account both the insulation and the impact of the wall framing as well, rather than just the insulation itself.
The imperative is to drastically lower the embodied carbon in our new housing by reducing the ongoing operational energy requirements. There is significant potential for over-heating, especially with MDH buildings – and this needs to be addressed simultaneously with ventilation so that we don’t have people boiling hot in their new house – the opposite problem from what we have at the moment. External insulation significantly reduces the amount of energy required to heat or cool the building – this way you can control the heat loss to exactly when and where you want to. In MDH, often the external walls are mainly openings – and that doesn’t help.
Structure
Terraced houses generally have great lateral resistance in one direction (parallel to the ITW), but often poor resistance in the other direction (perpendicular to the ITW), due to the inclination of creating large open glazed frontages. This necessitates portal frames typically as a steel portal at ground floor and may be repeated at first floor. For MDH low-rise apartment buildings three or more storeys tall the block will likely follow the more traditional route of a central structural core with columns only to the perimeter of the block, complete with infill wall panels to the entire perimeter.
With CLT, the schema changes, with the ability of CLT to be assembled like a pack of very solid playing cards. Panels are screw-fixed to each other to create an immensely strong rigid box which can be designed and engineered to exceed seismic requirements. This method of assembling CLT works well with individual punched windows in the external façade and can create very exact opening sizes which will assist in the planning phase. Precast concrete panels can also be locked together like CLT, although they are five times heavier and a lot more cumbersome on the joints. While the structural engineer may want to have just one material or structural system, with MDH it will often end up being a hybrid solution.
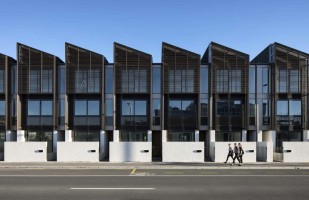
Full width glazing or punched whole windows
It is possible that more upmarket apartment buildings will have a glorious view to look out on, justifying full width glazing across the front of the living room. More likely, however, is that too much glazing is just a real pain. If there is no stupendous view, then limit the opening to sliding doors onto the deck of the living room but ensure there is an opening window as well, particularly on elevations with high sun exposure (typically the west wall). The rest can be solid wall. This limits solar gain and allows systems with higher thermal performance to manage the heat gain.
Temperatures inside poorly-designed MDH units can soar if there is too much glass, leading residents to try to limit the heat ingress with curtains or blinds remaining closed all day. That is an exercise in futility. Better to carefully design the window opening itself, model the living space to ascertain overall heat gain, and then leave the glazing without having to swaddle it in curtains, which can lead to issues of condensation due to the restriction of airflow and ventilation to the space. Let the cleansing power of the sun come into the room each day, but not so much that it is boiling. That means thinking about the colour of your window frames as well. White or silver work best for rejecting heat – dark or black window frames will transmit excess heat inside the home.
Windows work both ways – people see out and people can see in. That is part of the glory of urban city living, both being able to see neighbours opposite going about their daily lives and knowing that they can see you as you go about yours. In the Netherlands urban living has been the norm for hundreds of years, with tall, terraced houses containing tall windows into the living spaces, maximising light and warmth into the house. And largely without curtains too – it’s part of the Dutch national feeling of gezelligheid, a feeling of openness, of nothing to hide, cosiness and fun. That’s an admirable attitude that we too could follow. A type of dwelling design the Dutch have, called a doorzonwoning, meaning a house with a large living room that stretches from front to back with large windows at each end enabling through breezes, also seems a very popular concept for us to inherit as a model for living rooms in MDH.
The open nature of city windows is one of the many reasons why urban life is more interesting than suburban life – often blank, bland and off-putting with flat drawn curtains shutting out the outside. In Aotearoa, we will forge our own path in terms of openness, no doubt a mixture of Māori, Pākehā and Pasifika, Asian, and African, as our nation converts to a more urban cityscape in our new multi-storey future. What we might call whakatuwhera, or openness. Personally, I’m just hoping that our architectural legacy is not filled with net curtains obscuring views and battling against over-heating. Low-e coatings can help with this and even electrochromic glass is now available, allowing the occupant to simply turn down the brightness of the window. (See Industry Solution 10A)
Window design – ventilation, noise etc.
Our windows are not just a thing to look through at the view on the other side, they are also the absolute weak point in our external thermal envelope. Even the best triple-glazed window is less thermally efficient than the most basic insulated wall. We also need to make sure that the window frame itself is not the weakest point and therefore the focus of condensation, like it is now. Luckily, glazing systems continue to improve and joinery with a thermal break can drastically improve the window performance.
Along with the new requirements for the insulation of the external wall is an accompanying need for better window design. There are three main materials that are used for window frames in New Zealand: the more traditional timber window frame, the aluminium window frame that has been so popular in New Zealand over the last 50 years, and the plastic PVC and fibreglass windows with their small market share. Thermally-broken aluminium systems are increasing their market share in New Zealand, while composite systems with European-style timber interior and aluminium or PVC exterior, are also now on the market. There is no point in installing a lower-specification window in a higher-specification wall – always ensure that your window frames feature a thermal break.
Windows also have another crucial function – to open and create a source for ventilation. This may well be the only source of ventilation into the dwelling – if we are stamping out the weatherboarded draughty walls that cause mould and dampness, then we will no longer be getting the replacement air sneaking through the walls as it has done for the last 200 years. However, this brings another issue into focus – the possibility of a modern dwelling not being able to breathe properly, bottling up warm, humid air inside, causing fresh problems of another kind. The best new window systems are not only thermally broken,
but also capable of providing ventilation. This is a critical issue, as it can be solely reliant on occupants to operate, and achieving the bare minimum of fresh air turnover is hardly the same as achieving good quality internal air quality environments. Consider opening windows in tandem with good quality mechanical ventilation (refer also to Chapter 13).
Window proportions
Although discussion around window proportion rarely happens at architecture schools in New Zealand these days, it is still worth discussing here. Let’s face it, in the majority of recent New Zealand housing, windows are ugly and mean, badly proportioned and poorly planned for opening and practicality. There is nothing quite like being able to walk up to a window and simply throw it open, revelling in the influx of fresh air and sunshine. That’s hard to do when windows are fitted with width restrictors to stop you falling out. Top-hung awning windows restricted to a maximum of less than 100mm at the bottom may be perceived as ‘safe’ but they are uncomfortably hot and frustratingly closed off. Far better is to have two opening side-hung casement sashes, one opening to the left, the other to the right, to capture a breeze and divert cooling air into your house, or away from it if the wind is too high. Sliding windows can work too, but can have issues, while bi-fold windows up high in a building can prove impossible to clean.
Bugs and other pests can fly into the house through the windows, increasingly a problem in Aotearoa as the climate warms – summer 2022 was the first time in Wellington we got attacked by mosquitoes, normally just an Auckland thing. So, plan for bug screens on windows, or other methods to permit air ventilation without the corresponding beetle infestation. If your window supplier doesn’t offer that option, bug them till they do.
Pleasant proportions can and do make a difference to the perception of the view out, as well as what the building looks like from the outside. Thanks largely to Andrea Palladio and the golden ratio, the Georgians worked with a vertical orientation of 1:1.6 which somehow just feels right. Square windows, popular for a brief while in the 1980s under post-modernism, somehow always feel awkwardly wrong.
A window of 900 W x 1440 H fits well into a 2700mm stud height and still conforms to the golden ratio with a pleasant palladian proportion. Other golden ratio window sizes are:
700 W x 1120 H
800 W x 1280 H
900 W x 1440 H
1000 W x 1600 H
1200 W x 1920 H
1500 W x 2400 H
One final point: always try to align the tops of the windows, as that makes the experience from the inside much more pleasurable. Personally, I recommend to set window and door head heights at 2.2m above finished floor level rather than a miserly 2.0m, which unnecessarily restricts views out for taller people.
Window installation
When installing the windows into the wall it is important is to align the thermal barriers – this includes the window and its thermal break – with the thermal installation in the wall. Standard practice for many existing window manufacturers has been to install the window on the outer face of the wall so that the external glazing is in line with or slightly proud of the external façade. With a thicker, better insulated façade, the thermal break in the window frame needs to be aligned with the whole overall wall construction system.
To do this, the window should be slightly recessed into the wall, which has the added effect of creating shadows around the window and lessening the exposure to direct rain. The Metro Series ThermalHEART systems are also compatible with the Ventient passive ventilator, helping control ventilation inside the house. New window systems continue to be developed and marketed, so ensure the system is fully understood before specifying.
There is a strong imperative for MDH projects to comply with far higher design and construction standards. These include aiming for New Zealand Green Building Council (NZGBC) Homestar standards as a minimum, while also potentially aiming for Passive House or Super Home values. Exact details differ but all rely on far higher levels of insulation and airtightness than the NZBC to keep heating requirements low. Increased ventilation via opening windows to allow natural through-ventilation is the simplest answer, but not always possible due to wind, physical orientation and security issues. We are a moist country – pluvially intense
– and can’t rely on natural air movement alone, even in Wellington. Mechanical ventilation systems will be required to provide adequate fresh air into and remove residual moisture out of each MDH dwelling. All these issues go towards the operational embodied carbon build-up of the dwelling. Building to Passive House or SuperHome standards, or achieving a minimum eight Homestar rating will ensure that ongoing electrical heating bills will be negligible. Refer to Passive House, NZGBC, and Superhome for further information.
Sound transmission through openings
Despite all the work going into a wall or floor construction, windows and doors remain the weak points for acoustics. Doors are relatively simple to treat – while hollow core doors are fine for items such as wardrobes or cupboards, they are fairly useless for stopping acoustic transmissions between rooms. Always install solid core doors between rooms where you want privacy: bedrooms, bathrooms, living rooms, and of course, the front door into any unit. Acoustically seal around the perimeter to stop any sound leaking through. Short of planning to have a double set of doors between spaces, there is not much more that you can do.
Windows are slightly more difficult to deal with. With recent changes to the NZBC, double glazing is getting more common, even in Auckland, and triple glazing may even start to become commonplace further south in Te Waipounamu, the South Island. But double glazing (strictly speaking, an IGU or insulating glass unit) on its own does little to stop sound getting through – sound travels quite well through ordinary residential thickness of glass (typically only 4mm thick). With two panes of glass so close together, it does have a small noise reduction effect, but not enough. What is marketed as ‘hush glass,’ where two layers of glass are bonded together with a plastic interlayer lamination, also has a small effect, but at slightly different frequencies. The problem with any window that opens is that as soon as it is opened, noise gets in and all your hard work is undone.
What is most effective is thick glass, set into a frame that does not open. A single panel of 10 or 12mm glazing can be hugely effective in stopping noise, the thicker pane greatly reducing the acoustic vibrations because doubling the thickness of the glass effectively doubles the mass. Thicker IGUs with bigger air spaces and laminated, to absorb more sound waves. For ultimate reduction in acoustic transmission through windows, consider what the experts say. Two layers of thick glass, at least 150mm apart, not parallel, and with an absorbing material in the void between them. While that would not be specified in ordinary residential MDH dwellings, if you are building in a zone near an airport, it may be the only way to control the noise.
Materials
Materiality of external façade walls
The external façade wall (EFW) is where it all comes together for the architect or designer, combining months of design, pages of planning and detailing, and agonising over the exact expression of the right specification for the colours. What the casual passer-by may only notice as a ‘nice building’ (or not) covers over the many thousands of hours that have gone into it from the entire team – the developer, the architect, the builder, the labourers and the skilled craftspeople who put the project together. But of course, it is behind the final millimetre of the façade that really counts.
Very early on in the design process decisions need to be made about what sort of structural system the project should use, as well as what sort of façade cladding system the project should incorporate and feature. These are the nail-biting moments of whether to go with a brilliant new product system, or to stay with what you’ve always done. Materials may behave different in the taller, windier environment of MDH and their pointy angular skylines, and maintenance will certainly be a lot harder to undertake. Inevitably, there will be more than one system being used – at the very least there will be a structural system and a separate cladding system, interfacing in both cases with a glazed window system. Usually these are carefully separated with a cavity. In commercial office blocks the choice is often taken to glaze the entire external face of the building, to ensure that one contractor (usually the cladding subcontractor) has complete control – and complete risk/responsibility – for the external façade. It is a far different, and to be honest, far more difficult task for MDH, as in Aotearoa the residents of housing do not usually want to be closeted away behind an unopenable glazed wall and nor do they want to have a dwelling which is composed of just one material and looks exactly like their neighbours. In this country we want variety and choice, even if we do not like the inevitable price that comes with this. Let’s look at the different aspects of the EFW, one by one.
Insulation – H1
External wall insulation requirements will rise, eventually. This will potentially be extremely important for MDH, as under the H1 regulations, each wall, floor, and roof needs to be adequately insulated. However, as noted previously, MDH may have only one or two exposed sides that need to be calculated – and that may mean that only one sixth of the external surfaces of each dwelling are insulated. Because the ITW and ITF are treated as a net zero sum (neither losing heat nor gaining), then the remaining walls are concentrating the effects of the increased insulation levels.
Generally, the method of insulation of our external walls may need to be rethought, not just in MDH but in other, stand-alone housing too. Our system of inserting a layer of insulating batts into the structural framework means that there are some areas which are well-insulated and other areas which are just complete thermal bridges from inside to outside – Beacon Pathway’s research indicates that between 24% to 57% of LTF walls are comprised of wall framing, meaning that a framed wall with R2.0 insulation may end up having a construction R-value of just R1.44 which is well below minimum code requirements (Beacon, ER53, 2020). This significantly reduces the wall assembly’s effective insulation value and allows thermal bridges to permit both heat to escape and cold to infiltrate – a massive problem when the humidity inside the wall starts to condense inside the wall. As a result, the building may start to leak from the inside and become a source of potential rot – a ‘sweaty’ building issue rather than a ‘leaky’ one. As the humidity levels slowly build up in the interstitial spaces in a building wall, residents in the building may be unaware that any internal rotting is happening, until it is all too late.
There are a couple of key ways that we can tackle this issue – eliminating cold bridges and eliminating moisture ingress into the wall itself. Eliminating cold bridges is the first and most important action to take, and that means no longer letting the timber framing be the main determinant of the external insulation. Light gauge steel-frame (LSF) buildings have this focus even more so, given that steel is a far better
transmitter of heat than timber – so it is crucial that LSF buildings have a thermal break between the interior and the exterior. But eliminating this thermal bridging and installing higher levels of insulation is not the only thing needed to stop condensation. The mechanical extract system is 100% necessary in order for that stale moist air to be extracted and fresh air to come in. Hyper-insulated walls and roofs can still permit dampness and mould if the moisture extract is not properly addressed.
(See Industry Solution 10B and 10F)
Building wraps/underlays
Traditionally, most of these requirements were performed by one simple response: a sheet of tar- impregnated building paper, fixed directly to the external face of the studs and sitting directly behind the timber weatherboards. While that solution has been useful for many New Zealand buildings over the years, the building industry has moved on and architects are increasingly looking for more sophisticated systems that will perform to a far higher quality standard. We should no longer rely just on a single layer of building paper to protect the envelope of our buildings. (See Industry Solution 10C)
Building wraps/underlays are still a crucial part of the building system, but are often now seen as just one element in a vital battle against moisture ingress from both inside and outside. They are just one of the building control layers. Control layers often perform multiple purposes and so need to be clearly understood. The building envelope control layers that we have are:
- Cladding – driving rain, water, wind, UV protection
+
-
Weathertightness control – watertightness and drainage plane
-
Air pressure control – airtightness and vapour transport
-
Thermal control – condensing surface control and thermal efficiency
-
Water vapour control – vapour diffusion (Tennent, 2020, Envelopes Have Layers).
Weathertightness control
The external weather envelope is composed of the rain sheeting barrier (cladding) as the first line of defence for bulk water and the weatherproofing (rain/drainage plane and weather-resistive barrier e.g. underlay) as the second line of defence and primary barrier. The use of drained and ventilated cavities has let us separate these two layers into their different functions, adding further resilience to the overall weatherproofing. It is important at this point to stress that this water needs to be drained away to the exterior at each floor level and not allowed to travel on down the building. Remember the BRANZ mantra – deflection, drainage, drying, and durability.
(See Industry Solution 10D and 10E)
Air pressure control
Traditional New Zealand buildings have always been poor at airtightness, with gaps between weatherboards, window panes, and a complete lack of adequate insulation. This is changing and with modern detailing, tighter construction tolerances, better means of building and increased use of flashing tapes, our homes will be increasingly sealed off from the climate. This allows us to keep the inside temperatures separate from the outside and so stop the loss of heat. Contaminants such as diesel dust from roads can be stopped and fresh air intake controlled. Air changes can be planned, not accidental. However, this increased sealing of the dwelling will have the side effect of making internal moisture control more difficult.
The air pressure control layer serves two associated functions, not just preventing air movement between inside and outside, but also by stopping water and any direct/residual moisture that gets into the cladding. The air barrier therefore needs to be detailed as both an air barrier and as a water barrier, and it should be sealed onto other elements that are watertight in order to maintain continuity of this seal.
Thermal control
Thermal insulation performs its role best on the external face of the structure, allowing thermal mass inside the dwelling to be harnessed to even out the internal temperatures. Thermal insulation on the inside face of a building achieves the opposite. Traditionally New Zealand has only insulated between the structural members such as studs and dwangs, leaving the thermal bridges visible to the outside and reducing the overall effectiveness of the insulation, generating potential condensation within the exterior wall system. While New Zealand was scared off external insulation during the leaky building crisis (Dyer, 2019), that involved inadequate detailing and inflexible cladding systems constructed over a highly flexible substrate. It is time for New Zealand to once again insulate externally, but to do it properly this time. A layer of insulation such as mineral wool batts – Rockwool or SmartFaçade – can be fixed externally, to adhere to the inner surface of the drained and ventilated cavity. (See Industry Solution 10F)
Water vapour control
Water vapour entering the structural cavity, and building up from the inside can be avoided by installing a smart vapour retarder positioned on the warm side of the wall – in most MDH construction, this will be on the interior side. This is particularly important in locations with extremes of temperature and humidity. Queenstown and Wanaka projects in particular, with extreme cold outside and roaring fires inside, are highly vulnerable to interstitial moisture – excess water vapour building up from the inside, potentially causing Leaky Building 2.0. These vapour membranes can permit moisture within a wall to dry out, while stopping additional moisture from making its way in. Be careful though, as introducing vapour retarders in the wall without understanding the impact of the internal climate and ventilation or moisture loads should only be done when a hygrothermal condensation assessment is completed. (See Industry Solution 10C)
Ventilated cavities
It’s hard to believe that just 20 years ago, using a drainage cavity on a residential building was seen as a foolish activity, and few projects were built with one. Now, few projects are built without a cavity. Using the correct full name ‘drained and ventilated cavity’ means it should do exactly that: it should provide a drainage plane for external moisture to move through and off the building without gaining entry, and also the cavity should be open top and bottom to the atmosphere, so that rising ventilation can dry out the surfaces within the cavity. If the channels into the cavity are blocked, especially at the bottom where it should be free-draining, then the moisture can get trapped and then the inevitable happens: mould grows. BRANZ have previously advised that 20mm is the minimal distance for the cavity, between the inner and outer face of a fully drained and ventilated cavity, although drainage boards can be used at times behind some direct-fixed claddings.
Structurally insulated panel systems (SIPS)
SIPS are a system of growing importance in New Zealand, being increasingly used on detached houses. SIPS are lightweight systems composed of a thick polystyrene blank sandwiched between two layers of oriented strand board (OSB) or treated plywood, linked together at the splines to provide a thermally excellent wall. Joints on panels are taped and a cavity and cladding are installed over the top, with the system capable of being used for multi-storey construction. This system is adaptable for hybrid construction involving different structural systems, such as a concrete floor and SIPS externally. In the USA and Canada, there are examples of SIPS buildings up to five storeys tall, but none so far in New Zealand. Obviously, being a system with polystyrene insulation, attention to fire detailing is vital. Seek expert advice. Engineer your solution very carefully. Establish a drained and ventilated cavity and then over-clad directly with an approved façade system from the range noted here in Chapter 10.
CLT façades
As you will have gathered, CLT is one of the new wonder materials for this century, that may make it possible for us to build taller, denser buildings that encapsulate large amounts of CO₂ in the form of engineered timber panels. Despite Aotearoa having one of the best pine forestry systems in the world, it is only recently that we have started following the lead of the Austrians and Finns and are now producing our own CLT products both here and in Australia. This makes a lot more sense to me than exporting pine to China to be turned into toilet paper. CLT is being used increasingly more in residential apartment buildings in the UK and it is starting to be used here as well now. The large slabs of CLT can for the most part be simply screwed together, enabling building structures to be completed in a fraction of the time that an in situ concrete slab building can be done. Like a concrete wall, the CLT will need a layer of external insulation and a final weatherproof cladding system. CLT systems have a lot more in common with concrete detailing than you might think and CLT buildings have been over-clad in brick in the UK – see Dalston Works in Modern Apartment Design (Marriage, 2022) – although they are more commonly over-clad with a lighter façade system such as profiled metal or terracotta tiles. CLT has a bright future ahead in New Zealand especially in the crucial four to six storey range. (See Industry Solution 7C)
Concrete façades
Several of the systems offered in the ITW section can also be used for external façade walls, including concrete-based systems such as KOROK and INTEGRA. There is also the option for solid concrete walls poured on site (this has an effect on time constraints and accuracy on site) or precast off-site (much greater dimensional accuracy but requires frequent cranage). Great effects can be had from the treatment of the concrete via exposed aggregate, bush-hammering or sandblasting, but this will mean that the insulation will need to be continuous on the inside of the façade. Internal insulation means missing out on all the glorious goodness of the thermal mass that comes for free with concrete well insulated from the outside. Usually this means that concrete façade walls will have an external insulation layer and then external cladding system over the top.
Brick façades
As noted in several of the case studies, brick is an excellent long-lasting, low-maintenance solution for façades. The brick industry has developed the ability to engineer brick façade systems which give the appearance of solid brick façades. These brick veneers have all the advantages of brick systems, such as weathering ability (clay bricks do not fade or rot), good-looking appearance as they age, and a wide range of choice in colour, size, and appearance. It is worth checking out some of the creative patterns on Ockham’s Kōkihi development, with vibrant brick features in an almost tukutuku design on the exterior face of the building. Lastly, even the brick pointing can be a design feature as well, in both colour choice and type of finish – concave, struck, flush, weathered, v-joint or simply raked back.
Brick veneers have been used here since the Napier earthquake and are commonly seen on three to six storey buildings. With specific engineering design, supported clay brick veneer and brick slip façade systems can be considered in most wind and seismic zones for MDH. Clay brick veneer façades have a minimum cavity width of 40mm. This is the main part of what is a ‘wet cavity system’, which allows water to pass through the bricks and run down the inside face, then out the weep holes or in most cases evaporated by the sun and wind.
An important part of the design of brick buildings is to design to the repeating module size of that brick, for both the opening widths and heights, and the resulting brick piers between openings. Master Bricklayers are highly skilled, working quickly in teams. They can provide exact specifications on the layout and installation of the brick ties, making minor adjustments in the mortar thickness, and with modern diamond saws, cutting bricks is simple. For specialist features like brick quoins and brick voussoirs you will need to plot out the position of every brick accurately, but for the most case, brick plan dimensions and brick heights should be recorded on your drawings, aligning with the site datum.
The benefit of clay brick veneer is, ‘as it is laid, so is it finished’. It is very low maintenance, has the durability to last over 100 years, the versatility to change its appearance over time by acting as the perfect substrate for paint or plaster, and the ability to absorb high impacts.
Weatherboard on LTF
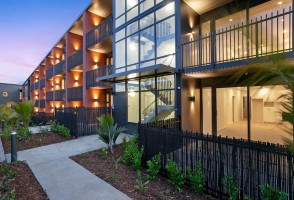
Painted or stained timber weatherboard solutions have no real place on any high-rise construction system in New Zealand, unless they are easily reached for yearly maintenance. Scaffolding costs to reach high places are excessive, and so solutions that require frequent maintenance should be avoided. There are alternatives now, however, and the use of extruded aluminium weatherboard systems is an obvious and long-lasting solution. Lightweight solutions are great to lessen the seismic load, so aluminium cladding systems such as those offered by Nu-Wall offer a great solution. There is a large number of possible profiles, both vertical and horizontal, in a proprietary fixing system, with a wide range of powder-coating colours available for the cladding. (See Industry Solution 10K)
Terracotta on rigid air barrier on LTF
Increasingly, sophisticated façade systems proven from years of service life overseas are being specified for New Zealand façade claddings. Terracotta is one such system, being composed of kiln-fired modified clay, producing a highly stable product with excellent abilities to repel the weather. The terracotta interlocking/overlapping tiles have excellent long-term life prospects, and there are several competing systems on offer.
A common feature amongst them is that the substrate layer becomes the weatherproofing layer, so usually a rigid air barrier is installed, with all horizontal joints flashed, and vertical joints flashed. A proprietary cavity fixing system is employed, providing lightweight metal rails on which the baked terracotta panels can be hung. A particularly useful point about the terracotta tiles is that the open joint between the panels makes for a very flexible solution in the case of seismic movement. (See Industry Solution 10G)
Balustrading, decks and screens
Balconies were mentioned in Chapter 6 for their importance in providing a comfortable living solution for the inhabitants of MDH. What is even more important is designing and detailing the balconies in a safe and waterproof manner, so they can neither part company with the main building, nor allow people to fall. There are systems such as the lightweight modular Grappler Balcony system from Belcanto which comes to site 99% complete and is simply craned onto the building and clicked into place, fixing onto structural anchors that have already been cast in place. Systems like this are great to avoid the penetration of the façade by structural beams, and also lessen thermal bridging to near zero.
The balustrading to a balcony is an important part of the look and feel of the building and getting the right balustrade is a difficult procedure. Balcony suppliers have a wide range of balustrading systems that can enhance the look of your MDH building project and we feature a couple of systems from Juralco later in this chapter. Fully glazed balustrades can look great, with transparency both ways – but they can also display too much!
With balconies in MDH often being used as excess storage space for bicycles, barbecues, children’s toys etc., the viability of a glass balustrade needs to be carefully thought through, especially with regards to cleaning and maintenance. With systems now including a clamping system for glass balustrades, physically installing glass is so much easier than having to align and drill fixings, but the difficulty of cleaning the outside face of the glass remains. While you can easily install a toughened glass pane to 1m above finished floor level, reaching down to clean the outside face is difficult and dangerous at times. Seaside locations especially suffer from this, with dried salt spray requiring frequent cleaning. As noted in the illustrations, having a solid balustrade for the lower part of a wall, and glazing only to the top part of a balustrade, makes a lot of sense both aesthetically and in terms of easy access to cleaning.
A good alternative is to have metal railings as balustrading to the balcony or roof deck, with vertical rails fixed to a substructure post and rail system. These balustrades can be powder-coated to the colour you require and provide good privacy when viewed side-on. Various systems exist – again, the important thing is to avoid any chance of the fixings piercing the external façade and causing a path for leaks. Use a proprietary system which has certified details for the balcony/balustrade loadings required.
Façade systems
The remainder of this chapter is used to show selected product supplier’s systems for external façades, which can be the place where your architectural desires can be made manifest.
External Façade Walls
Industry Solutions
| Solution | Brought to you by | |
|---|---|---|
| 10A | Windows | Metro Series ThermalHEART™ |
| 10B | Insulation | Knauf Insulation |
| 10C | Underlays | pro clima |
| 10D | Rigid air barrier | RAB Board by James Hardie |
| 10E | Rigid air barrier | GIB Weatherline® |
| 10F | External insulation | Outright Continuous + Technoform |
| 10G | Terracotta cladding | Terreal |
| 10H | Fibre cement cladding | EQUITONE + Siderise |
| 10I | Fibre cement cladding | Cemintel Territory |
| 10J | Clay brick veneer | The Brickery |
| 10K | Aluminium weatherboard | Nu-Wall Weatherboard |
| 10L | Balustrades | Juralco |